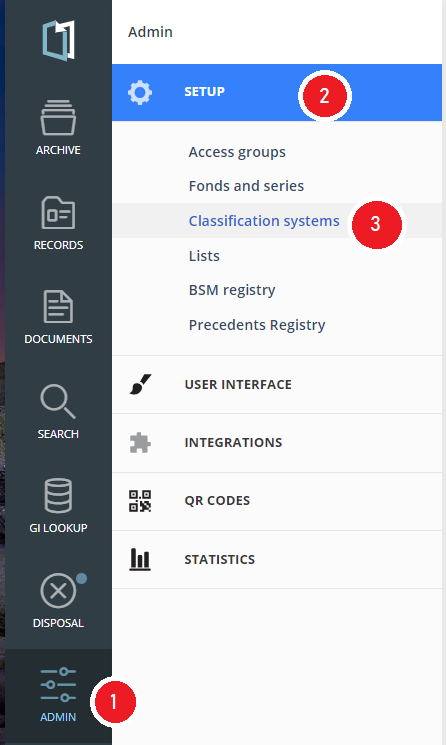
Admin section - Classification Systems
All public enterprises must have a classification system - often called an archive key - for organizing their case archive. The system must cover all business areas.
 |
|
When you click on Classification systems, you will see all classification systems in the list on the left.
A classification system can be structured hierarchically, as in the example below. Clicking on the gray buttons expands the underlying levels.
At the top right are icons for editing and deleting the classification system.
A classification system can only be deleted if it is not in use.
To create a new classification system, press the green button, "New classification system".

Creating Classification Systems
To create a new Classification System, click on the green button at the bottom left, labeled "New Classification System".
You will then get the following image:

- Here you name the classification system, and add a description.
- Under "Import Classes?" you can select No, or move it to Yes. .
- If you choose Yes, you get the option to load the classification system
from a file. To do this, click "Select file" and find the desired file on your
PC. - If you keep it at No, you build up classes and subclasses manually
- If you choose Yes, you get the option to load the classification system
- You must select the import type for the file you are importing. The two choices are as follow:

- When the classification system has been created, you can only add new classes manually, or by integration.
Manage classes
To create, edit or delete classes and subclasses in the classification system, click on
"Classes" as shown with a red square in the image below when you are inside the
Classification system:

If you already have classes in place, these will appear in a list as shown above. The number at the
back of the line shows how many subclasses there are in each class. If you click on the line, you will get a picture showing the subclasses of the class you have clicked on.
Create class
To add a new class, click the blue "New Class" button, shown with a red circle in the image above.
Then fill in the window that appears:

The window to create new subclasses is identical.
Disposal
Have you activated Disposal in the solution also shows "Set disposal scedule" as an
option when creating classes and subclasses.
Assign a disposal decision (and authority) and specify the retention period.

Edit and delete class or subclass
If you want to edit or delete a class or subclass, hold the mouse pointer over the relevant line. You will then get two icons at the end of the line, as shown below:

To edit the class, click on the pencil, shown with a red square in the figure above. To
delete the class, click on the trash can, shown with a red circle above in the figure above.
To complete the deletion, you must also verify this in the window that appears.
Classes that are in use cannot be deleted.
Edit title and access to the classification system
To edit a classification system, click on its name in the list on the left. You get
the following image:

This image shows the access rights for this classification system. Here you can change the rights for the individual access group.
To edit the name, click on the pencil in the right corner, marked with a red square in the image
above.
You can then edit the Title and Description, as shown in the image below:

Delete Classification system
If you want to delete a classification system, this is done by clicking on the trash
can icon, shown with a red circle two images up.
You must also confirm the deletion in the window that appears.
Classification systems that are in use cannot be deleted.